Küpün açılımı nasıl çizilir?
Bu yazımızda küpün açılımı 3. sınıf, küpün açılımı 4. sınıf, ilkokul matematik, küpün açılımı nasıldır, Küpün açılımı, küp nasıl çizilir, küpün açılımı nasıl olur, küp açılımı, küp çizimi, Küpün açılımı nasıldır? bulunmaktadır.
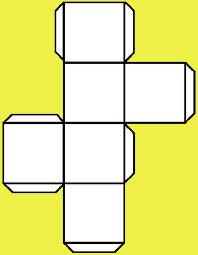
Küp altı yüzeyi olan üç boyutlu bir şekildir. Küp altı adet karenin birleşiminde oluşur. Kartondan veya kağıttan bir küp yapmak ister açılımını çizerek yapabiliriz. Küpün açılımını çizme için iki yol vardır.
- Bir tanesi ve en pratik yolu küpün açılımını yazıcıdan çıkarıp kartonun üzerine kopya kağıdı yardımıyla çizip kesmek. Kesilen şekli çizgilerinden katlayıp yapıştırmak.
- Diğer bir yol ise cetvel yardımıyla kartona istediğimiz ölçülerde küp açılımı çizip kesmek.
- Kareli bir kağıt kullanarak da istediğiniz ölçülerde küp açılımlarını çizmek mümkündür.
Küpün açılımını ve başka bir prizmanın açılımını çizerken yapıştırma paylarını unutmayın.
küp nasıl yapılır, küp nasıl çizilir açılımı, cube shape, how to draw cube, how to make a cube, küp şekilleri,
-
How to draw a cube shape step 7
Step 1. Draw an 8 in × 2 in (20.3 cm × 5.1 cm) rectangle on a sheet of paper. If you want to make a cube that’s 2 × 2 × 2 in (5.1 × 5.1 × 5.1 cm), use a pencil and a ruler to create a rectangle that’s 8 in (20 cm) long and 2 in (5.1 cm) tall. For a cube of this size, your paper should be at least 8 in × 6 in (20 cm × 15 cm).[1]
Construction paper is best for this project because it’s sturdy, but you can also use standard copy paper.
If you want to make a cube that’s a different size, start with a rectangle with a length-to-width ratio of 4:1. For instance, if you want to make a cube that measures 4 × 4 × 4 in (10 × 10 × 10 cm), draw a 16 in × 4 in (41 cm × 10 cm) rectangle to start.
Step 2. Divide the rectangle into 4 squares. Use your ruler to measure exactly 4 in (10 cm) across the long side of the rectangle, which should be the halfway point. Mark that spot, then, draw a vertical line to divide the rectangle in half. You should see two rectangles that measure 4 in × 2 in (10.2 cm × 5.1 cm). Divide each of these rectangles in half again so you have 4 2 in × 2 in (5.1 cm × 5.1 cm) squares.[2]
If you chose to make a cube that’s a different size, adjust the measurements to divide the original rectangle into 4 even squares.
Step 3. Add a new square on top of the second box in the rectangle. Find the second vertical line in your rectangle, which is the left side of the second box. Use your ruler and pencil to extend that line upward by 2 in (5.1 cm). Do the same thing above the third vertical line, or the line that runs down the center of the rectangle. Then, connect the tops of the two new lines with a horizontal line. This will create a new 2 in × 2 in (5.1 cm × 5.1 cm) square just above your original rectangle.[3]
Try to keep your lines as straight as possible, or the sides of your cube may not connect.
Step 4. Draw 7 parallelograms to create the flaps for your cube. Starting on the far left side of the far-left box, draw 2 lines that angle in toward each other at about 45°. The lines should be about 1⁄2 in (1.3 cm) long. Then, connect the angled lines with a straight vertical line to make your flap. You’ll also need flaps on either side of the top box, a flap on the bottom of the box just below that, one on the bottom of the very bottom box, and a flap on the top and bottom of the far-right box.[5]
Step 5. The only box that won’t have a flap is the third box on your original rectangle. The very top and far-right boxes will have two flaps each, and the far-left, second-from-the-left, and bottom boxes will each have one flap.
This will be 7 flaps total, and you’ll use them to glue your cube together.
Step 6. Cut out the cube template. Using a pair of scissors, carefully cut along only the outside lines of your template, including the flaps. Don’t cut along the lines that divide the boxes from one another, or the lines between the flaps and the boxes.[6]
Your template should be 1 big piece when you’re finished.
If you accidentally make the wrong cut, either tape the template back together or draw a new one.
Step 7. Fold the template along the lines you drew. Start by folding each flap inward along the line that separates it from the box it’s connected to. Then, fold the template along the lines separating the squares. The four squares from your original rectangle will make the sides of the cube, and the top and bottom squares will become the top and bottom of your cube